

How to Remove Tartar at Home: The Safest Techniques Explained
Which methods protect enamel, which carry real risk, and how to use effective tools without causing damage.
Safety in at-home tartar removal is not just about avoiding obvious mistakes. It is about understanding which methods carry enamel and gum tissue risk, which are genuinely safe, and how to use the effective tools correctly so you get results without damage.
The Enamel Protection Principle
Every at-home tartar removal method needs to be evaluated through a single lens: does it selectively disrupt the tartar deposit without affecting the enamel beneath? This is non-trivial, because both tartar and enamel are calcium phosphate materials with similar but not identical hardness and crystal structure.
The key difference is structure and adhesion. Enamel is a dense, highly organized crystal matrix with long-range order and very high hardness. Calculus is a more porous, disorganized deposit with weaker internal bonding and significantly weaker adhesion to the enamel surface than the enamel has to itself. Any method that exploits this differential, targeting the weaker bonding without affecting the stronger substrate, is fundamentally safe for enamel. Methods that attack calcium phosphate indiscriminately (acids, for example) damage both.
A safe at-home tartar removal method is selective: it removes the deposit but not the enamel it sits on. Mechanical ultrasonic vibration at calibrated home-grade frequencies passes this test. Citric acid does not. Abrasive particles remove surface staining but at the cost of minor enamel surface wear with heavy use.
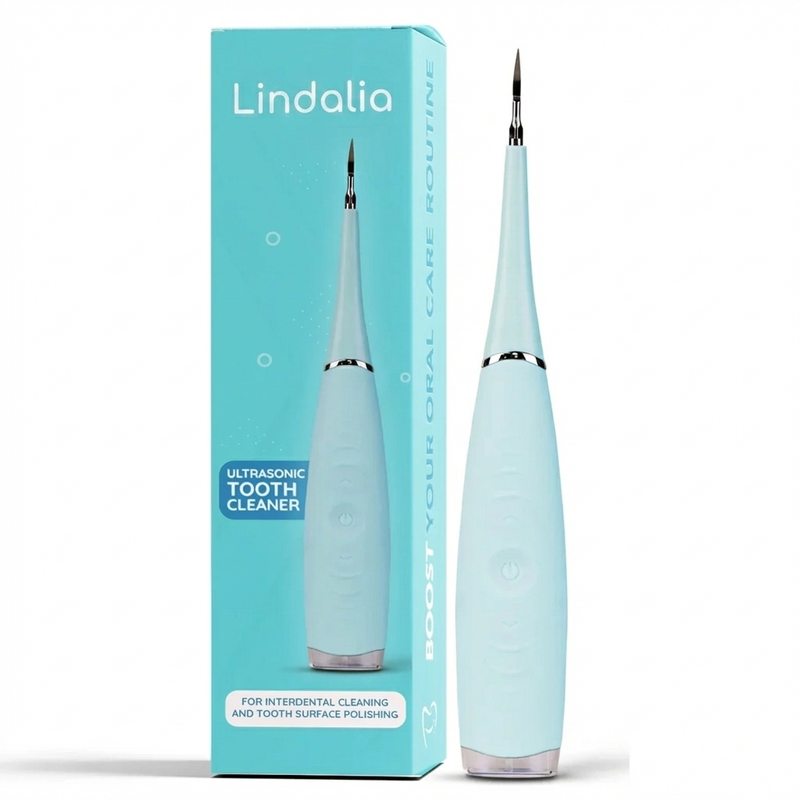
Ultrasonic Tooth Cleaner by Lindalia
Calibrated vibration that targets the tartar-enamel bond. Multiple intensity modes for safe use at any experience level. LED for visibility near gum margins.
See the ProductThe Safest Method: Calibrated Ultrasonic Vibration
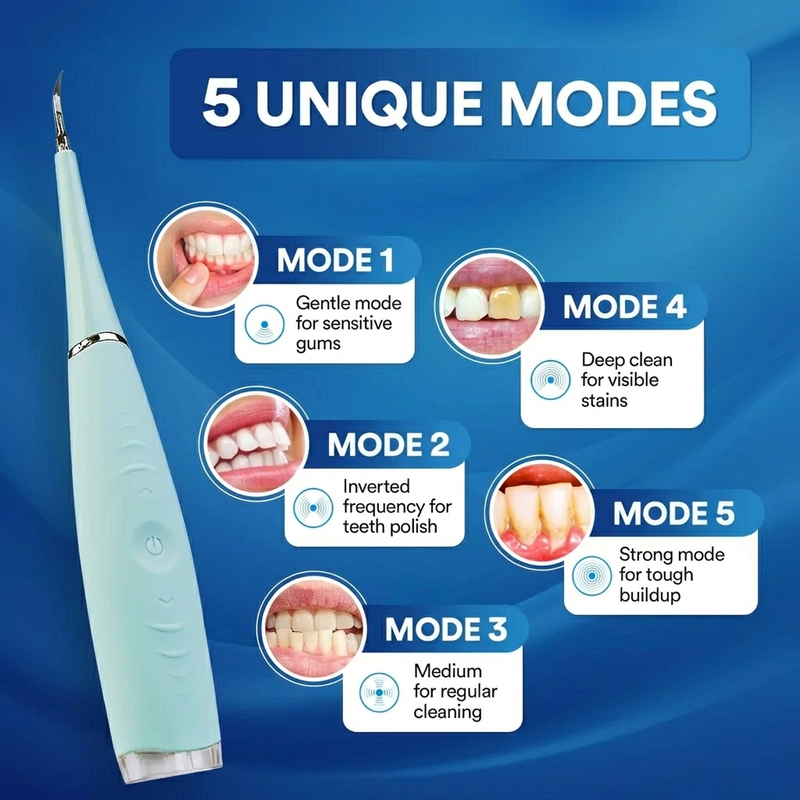
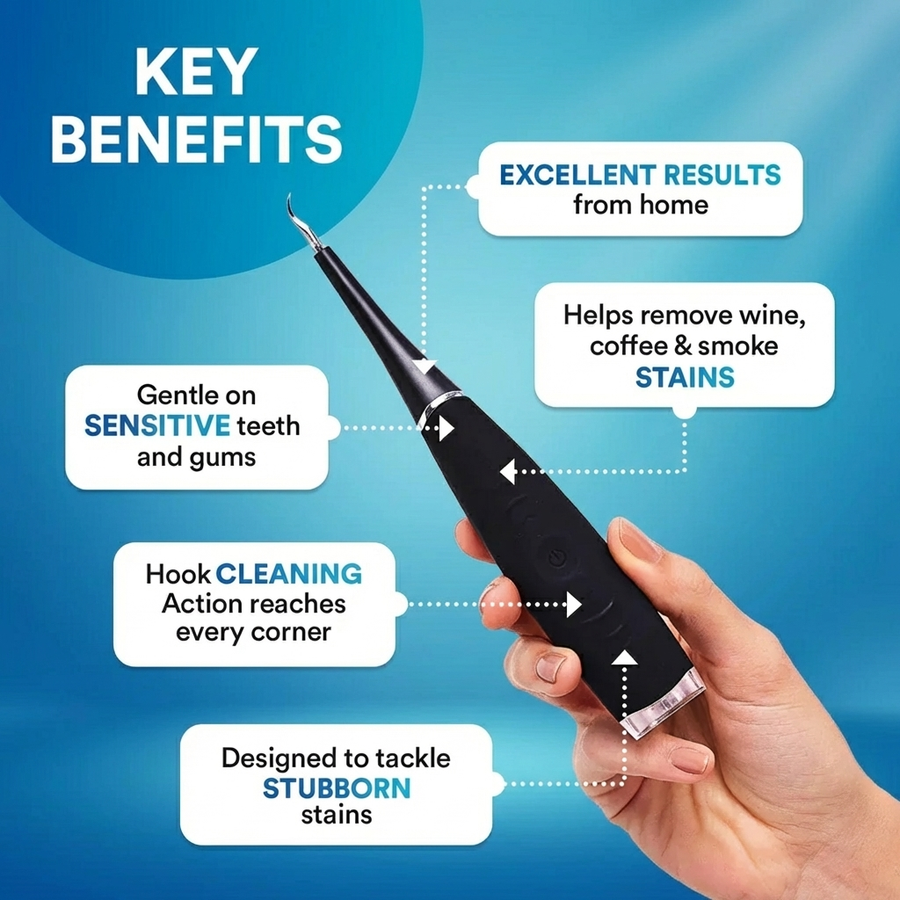
Home-grade ultrasonic devices are the safest class of tartar-targeting tools for non-professional use. The mechanism (vibrational energy transmission) is selective: it targets the weaker deposit bond without generating the force concentration that would affect enamel. The tip geometry is rounded and smooth, unlike the sharp blade edge of a manual scaler, so there is no cutting risk from accidental contact with gum tissue or root surfaces.
Safe use requires correct technique. The tip should be held nearly flat to the tooth surface (15 to 20 degrees), moved continuously rather than held stationary, and operated at the lowest intensity setting on first use, increasing gradually after several sessions. Pressure should be near zero: the tip should barely contact the surface. The vibration does the work, not the hand pressure.
Around gum margins: approach from below and sweep upward (away from the gum) rather than driving the tip into the sulcus. Home-safe tip geometries are not designed for subgingival access and should not be used to force the tip below the gum line. At the gum margin level, low intensity and continuous movement are the safety parameters.
The Dangerous Techniques to Avoid
Metal scalers at home carry the highest risk of unintended damage. As described elsewhere, the technique required to use a sharp scaler safely requires months of supervised training. Without it, the most common errors (downward pressure instead of lateral strokes, incorrect blade angulation, loss of stroke control) lead to root surface gouging, gum lacerations, and hard tissue damage that does not heal cleanly.
Acid-based home remedies (lemon juice, vinegar) present a different risk profile. The enamel demineralization that results from regular acid exposure is cumulative and permanent. Early enamel erosion increases dentinal sensitivity, makes surfaces more susceptible to staining, and in advanced cases exposes the softer dentin beneath. No calculus dissolution benefit justifies this risk.
Hard abrasives (some whitening toothpastes rated at RDA above 200, charcoal powders with irregular particle sizes, DIY salt scrubs) remove surface staining but also abrade enamel microscopically with regular use. Moderate abrasives rated below RDA 150 are generally safe for daily brushing. Very high abrasives should be occasional-use at most, regardless of what the packaging implies.
Dental bonding, veneers, and crowns require adapted technique but are generally safe with home-grade ultrasonic devices at low intensity. Root surfaces exposed by gum recession require the lowest intensity setting and minimal contact duration. Active gum disease (bleeding, inflammation) should be treated by a professional before adding any at-home removal tools.
Water Flossers: Where They Are Safe and Where They Are Not
Water flossers on standard settings are safe for gum margin flushing and interproximal cleaning. Used at maximum pressure directly into an inflamed or recently healed surgical site, they can cause tissue damage. For intact gum tissue with no active disease, standard pressure settings are safe for daily use.
A common misuse: directing the high-pressure stream parallel to the gum margin in an attempt to dislodge calculus. This does not remove calculus but can damage soft tissue if the stream is sustained at the gum margin for extended periods. The correct technique is to direct the stream at 90 degrees to the tooth surface and sweep, not sustained pressure at the margin.
The safest tools are the ones where the mechanism is selective. Vibration targets the weaker bond. Acids attack everything equally.
Gum Tissue: What Irritates and What Heals
Gum tissue at the margin is resilient but not infinitely so. Minor irritation from tool contact heals within 24 to 48 hours without consequence. Repeated, consistent trauma to the same area causes cumulative scar formation and can contribute to gum recession over time.
The signs that your technique is causing minor tissue irritation: brief, sharp sensitivity at the gum margin during or immediately after use, minor bleeding at the gum line in a previously non-bleeding area. If either of these persist beyond the initial 2 to 3 sessions of using a new device, your angle or pressure is the issue, not the device itself.
Healthy gum tissue that is not inflamed does not bleed from correct ultrasonic device use. If you experience consistent bleeding at the margins, this indicates either active gum inflammation (requiring professional assessment) or incorrect technique (requiring angle and pressure adjustment).
Lindalia Ultrasonic Tooth Cleaner
Calibrated home-grade vibration. Fine rounded tip, no cutting risk. Multiple intensity modes for controlled, progressive use around all surfaces.
See the ProductBuilding a Safe Routine
A safety-optimized at-home routine looks like this: low-abrasive tartar-control toothpaste twice daily. Daily flossing using the correct technique (sliding the floss under the contact point, not snapping it). Ultrasonic device use 2 to 3 times weekly at moderate intensity, on the lowest setting around gum margins and restorations. Water flosser as an adjunct for debris flushing and gum health. Professional cleaning every 6 to 12 months depending on your calculus formation rate.
None of these steps is complex. The safety is in the combination: no single method is aggressive enough to cause enamel or tissue damage when used correctly, and together they address both prevention and removal more effectively than any single method alone.
Lindalia Ultrasonic Tooth Cleaner
Calibrated vibration that selects for deposit over enamel. Safe around bonding, veneers, and crowns. LED light for precision near the gum margin.
See the Product